Getting Started in Aniimo
Take advantage of shortcuts for a better gaming experience as you explore unfamiliar regions. Entering the continent of Idyll introduces players to a wide environment where bonfires burn with Vein energy. Pathfinders can rest at these sites to steadily restore your Aniimo HP during long field expeditions. Teleporting provides a quick way to move your character across long distances between discovered landmarks. To use rapid transit, select a transportable icon on the map to choose your destination. Teleportable icons are usually blue across the regional map, such as Outposts, Branches, Blooms, and Sanctums. Transporters must be activated before they can be used across newly explored territories. Usually, you can activate a transporter by approaching it and interacting with it in the field. Once activated, its icon will turn from gray to blue, meaning it is available for fast travel. When you want to go somewhere else, just select and track your destination to view suggested paths. Some Aniimo can use climbing, swimming, or flying abilities while deployed and twined or when equipped for Pathfinding. Aniimo Pathfinding abilities, namely climbing, swimming, and flying, scale across multiple progression levels. The higher the level, the faster your Movement Speed when using them across open landscapes. Check our complete interactive world map to plan paths across regional terrain.
Starter Creatures in Breezy Plains
The regional habitat of Breezy Plains introduces players to distinct creature options that wield elements such as Fire. Understanding companion abilities helps assemble a versatile roster, because Aniimo and their skills have elemental differences that create counters. Pathfinders should use them wisely to deal more damage during early wild encounters.
Emberpup The Fire DPS Attacker
Lively and energetic, the creatures like to follow Flameruffs around in their native grasslands. Emberpup operates as a focused attacker that wields the power of fire to attack targets at close range. Its combat skill Fire Kick jumps up to dodge an attack, allowing flames to swirl around it before diving down and dealing damage to targets around the landing point. A successful dodge also deals 120% damage and increases damage by 20% for 20s. For ranged harassment, Emberpup launches a fireball at the target and applies 2 stacks of Fire Debuff for 5s. With Emberpup, you can hold the skill to aim and launch a fireball in the target direction. Fireballs can ignite vines, unlit bonfires, and other flammable wooden objects across the wild. They can also melt ice and detonate Explosive Barrels across obstacle paths. Its unique Scorching Flames trait increases damage dealt to elementally countered targets by 25%.
Cornet The Ranged Wind Specialist
Cornet wields the power of wind to attack targets from a distance across open arenas. Its tactical skill Tornado releases an air vortex at the target location, dealing damage and pulling enemies toward the center. Cornet can unleash Wind Bomb Rush to go all out, rapidly firing a continuous barrage of Wind Bombs. For electric coverage, Cornet fires multiple Electric Projectiles at nearby targets. If multiple projectiles hit the same unit, paralyzes the target for 5s. While airborne, Cornet activates Air Superiority, which increases Crit Rate by 20% while flying.
Jawling The Sturdy BREAK Specialist
Jawling acts as an endurance brawler that wields the power of wind to attack targets at close range. Its combat skill Wind Tackle tackles and pushes small-sized targets during confrontations. Using this tackle also increases own damage reduction by 15% for 10s. When struck by enemy hits, Jawling activates Counter Strike: after being attacked, increases BREAK efficiency by 25% for 10s. As a BREAK specialist, Jawling focuses on quickly reducing the target’s BREAK gauge, helping trigger Break State faster.
| Creature Name | Element | Role | HP | Physical ATK | Magic ATK | Trait Name | Trait Effect | | :— | :— | :— | :— | :— | :— | | Emberpup | Fire | DPS | 67.0 | 90.0 | 40.0 | Scorching Flames | +25% damage against countered elements | | Cornet | Wind | DPS | 96.0 | 121.0 | 54.0 | Air Superiority | +20% Crit Rate while flying | | Jawling | Wind | BREAK | 78.0 | 65.0 | 76.0 | Counter Strike | +25% BREAK efficiency after being struck |
Movement Controls and Environmental Traversal
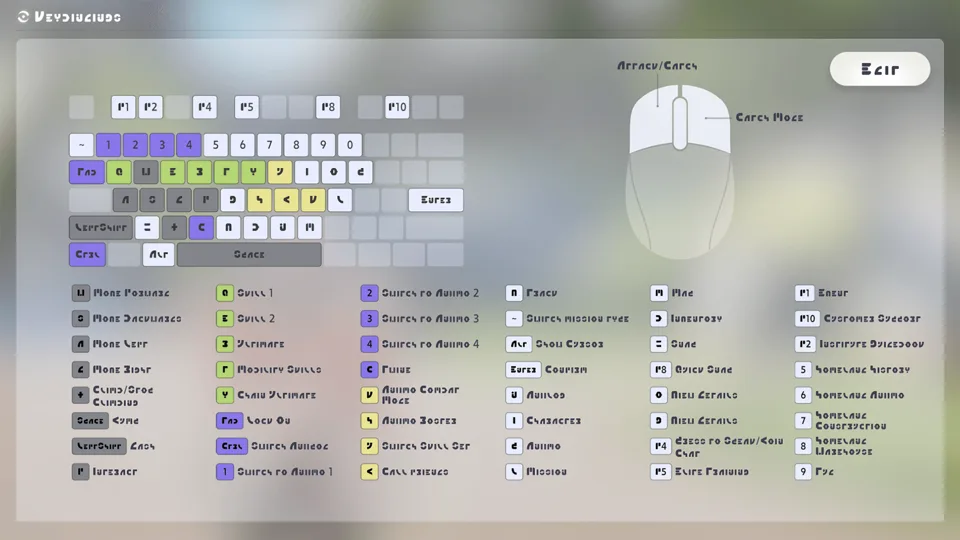
After obtaining Celestis, you gain enhanced climbing ability across high elevations. Approach a wall, then press key X to start climbing steep rock faces. Remember that pressing key X again stops climbing, because climbing costs Stamina. After obtaining Susuta or Skippy, you gain stronger swimming ability across lakes and channels. You’ll start swimming automatically near deep water and stop automatically after leaving it. To increase water speed, press key Shift to swim faster, which costs Stamina. After obtaining a Celestis, you gain Level 1 Flying Ability. Press key Space while airborne to start flying across open gaps. Press GlideRise to use Rise, quickly rising upward at a high Stamina cost during flight. While twining with an Aniimo that has the level 2 or level 3 flying ability, you can fly freely in any direction. While flying in Twine Mode, press Rise or Drop to move up or down. For rapid ground transit, the Aeroboard talent provides a hover board that helps you travel faster and does not cost stamina. Can also be used in Astra for swift city navigation.
| Mobility Type | Prerequisite | In-Game Command |
|---|---|---|
| Climbing | Approach a wall | Press key X to start climbing |
| Swimming | Near deep water | Start swimming automatically |
| Level 1 Flying | Celestis | Press key Space while airborne to start flying |
| Aeroboard | Pathfinder Talent | Helps you travel faster and does not cost stamina |
Party Management and Five Combat Roles
When organizing your active combat formation, each party can include up to 4 Aniimo. Press and hold an Aniimo avatar and drag it to the party panel on the left side of the screen. Use key 1, key 2, key 3, or key 4 to switch to the corresponding Aniimo into active battle. This rotation also works in Twine Mode during active field encounters. Aniimo have distinct roles, each with its own strengths. DPS focuses on dealing heavy HP damage across enemy formations. They work best when switched in while the target is in BREAK. BREAK focuses on quickly reducing the target’s BREAK gauge, helping trigger Break State faster. Support provides allies with various damage buffs or applies debuffs to targets, improving the party’s combat performance. REGEN increases the team’s REGEN rate, letting everyone use skills more often. Healing excels at restoring HP for the whole party, keeping everyone safer. Test different synergies using our interactive team builder to refine your party lineup.
Real-Time Combat Modes and Twining
In real-time engagements, your active Aniimo will fight automatically in the direction you command. The deployed Aniimo will then fight automatically according to the Pathfinder’s new command direction. In Command Mode, your Aniimo have different behavior modes, which can be switched with key J. Attack Mode means the Pathfinder’s Aniimo will actively attack wild Aniimo within range. Under Catch Mode, your Aniimo will not actively attack wild Aniimo. It will only enter combat when you attack or get attacked. When a wild Aniimo’s HP is low, your Aniimo will automatically stop attacking, making it easier to catch. Under Defense Mode, your Aniimo will not actively attack wild Aniimo. It will only enter combat when you attack or get attacked, then keep fighting until it defeats the targets. Press key C to enter Twine Mode with your deployed Aniimo. Press key C again to untwine whenever you need human commands. In Twine Mode, your character takes the form of an Aniimo and can move and use skills as that Aniimo.
BREAK Gauge and Creature Catching Mechanics
When attacking wild targets in battle, the yellow BREAK gauge under the status bar will keep decreasing. Once the gauge reaches zero, the Aniimo enters BREAK state, becoming unable to act and ready to be caught. After Alpha and Omega Aniimo leave BREAK state, they enter BREAK Recovery state until their BREAK gauge fully recovers. While in BREAK or BREAK Recovery state, they take greatly increased damage from all party members. While exploring the world, you can discover eggs left behind by Aniimos. Hatch them using the outpost’s Hatchinator—higher-quality eggs take longer to hatch. Once hatched, you’ll receive the corresponding Aniimo—and there’s even a tiny chance of obtaining a rare Sparkling Aniimo! Consult our complete catch rates overview to examine probability statistics across species tiers.
Elemental Counters and Debuff Buildup
Understanding that companion skills have elemental differences that create counters allows your party to defeat resistant foes. Use them wisely to deal more damage during field encounters. Some skills build the target’s elemental debuffs for their corresponding element. Elemental debuffs lower the matching elemental resistance and stack up to 20 times. Debuff buildup decreases over time, and the more debuff stacks there are, the faster the buildup drops. The world’s environment and weather can also build elemental debuffs. Using the Branch change-weather function allows Pathfinders to directly attract and spawn Prismana Form Aniimo across regional zones. Refer to our comprehensive type chart to study advantages across all elements before entering tough battles.
Resting at Bonfires and Outpost Healing
Whenever an Aniimo is injured during exploration, you can visit Healer Kim at the Outpost to heal it. Alternatively, let it recover at a nearby Bonfire when operating far from town. Bonfires scattered across the Idyll continent burn with Vein energy—approach a bonfire to steadily restore your Aniimo’s HP, or perhaps meet fellow Pathfinders for a rest and to share natural resources! Fireballs can ignite vines, unlit bonfires, and other flammable wooden objects when establishing camps. Resting at lighted camps ensures you approach a bonfire to steadily restore your Aniimo HP before venturing into danger.
Pathfinder Talents and Skill Configuration
In Command Mode, press key E, key Q, or key T to use Pathfinder Skills during active skirmishes. Here, you can set up both combat skill sets and Mobility sets. Combat skill sets are used in battle, while Mobility sets are used out of battle. As your Pathfinder Title upgrades, you will unlock more Active Skills and Passive Talents. Use Demo Tapes to learn Active Skills, and Report Cards to learn and upgrade Passive Talents. The active skill Heal allows you to sprinkle healing dust on the engaged Aniimo to restore its HP. Passive talents such as Enhanced Twining increase Aniimo damage by 7% after twining. Similarly, investing in Elemental Boost increases Elemental Counters effect by 2%. Another useful passive talent node increases Aniimo EXP gained from catching and defeating targets or using EXP items by 10%. Check our searchable skills directory to review all Pathfinder active abilities and passive talent nodes.
Creature Leveling and Growth Systems
To enhance your companion party, you can use EXP Items to level up your Aniimo. An Aniimo’s level is limited by your level. The higher your level, the easier it is to catch higher-level Aniimo. Item catalog entries specify that Aniimo EXP provides energy where every point of EXP becomes energy for an Aniimo’s growth. Use Dewdrop Crystals in the Resonance Star-Up system to strengthen Aniimo and gradually increase their base attributes such as ATK and HP. After reaching max stars in the current stage, spend Elemental Stones and other items to ascend and unlock stronger attribute bonuses. Equipping an Aniimo with a Held Item grants attribute boosts or unique effect enhancements. Held Items can be upgraded using other Held Items as materials. Upgrades increase the item’s base attributes by a fixed percentage. The maximum upgrade level depends on the Held Item’s rarity: Blue-quality items can be upgraded up to Level 5, Purple-quality up to Level 10, and Gold-quality up to Level 15. Browse our searchable items database to locate required growth materials across field outposts.
Alpha Boss Strategy Confronting Alpha Geoclaw
During battle with Alpha Geoclaw, the Alpha will unleash an Ice Prison to restrict movement. In Breezy Plains, Pathfinders can encounter Alpha Geoclaw within Nimbus Fields. Alpha Geoclaw commands the Ice element with levels ranging from 4 to 5 in Breezy Plains. During battle, the Alpha will unleash an Ice Prison to restrict the Pathfinder’s movement. Use Fire skills to destroy it quickly. Deploying Emberpup allows your party to use Fire skills to destroy it quickly when frozen. When the Alpha uses Tunnel, ranged attacks cannot hit, but Pound skills can force it out. Timing your heavy attacks ensures Pound skills can force it out before it recovers its BREAK posture.
World Exploration Blooms Branches and Aniilog
Across the continent of Idyll, Branches are an important part of the map system. After you activate a Branch, you can reveal the Blooms across a large area and unlock a new map layer where Pathfinders can view area info. Once the Branch is activated, you can also infuse Lumin Amber to increase catch chance, increase the Nurture count, change weather, increase the Sparkling rate, and more. Blooms are unusual flowers found across Idyll that react to latent Vein energy. Use Nurture to bring them to the budding stage during your exploration. To use this feature, obtain the area’s Bronze Collection Badge from regional tasks. Use Nurture to trigger a Wild Surge across the nearby meadow. Catch the Aniimo to gather Prismatic energy and form a fruit at the Bloom’s center during the event. After the Wild Surge ends, release the accumulated Prismana energy to receive rewards for your party. As a region’s Prismatic Energy state rises, higher-tier Aniimo become more likely to appear! Each time a region’s Prismatic Energy increases, there is a chance for the region’s Prismatic Energy state to surge to Full, drawing out Prismana Form Aniimo. When this happens, a brilliant Prismana Flow appears in the area, and the location where the Prismana Form Aniimo spawns is marked with special colors. After you catch an Aniimo, its Aniilog entry will be unlocked. Press a Field Notes entry to view clues regarding companion habitats. You can view an Aniimo’s traits and combat skills in the Aniilog before choosing your roster. Most Aniimo can evolve, so check the Aniilog for more details regarding growth requirements. Complete research goals in the Aniilog to earn Research Points and raise the Aniilog level. Catching new Aniimo is the most efficient way to earn a large number of Research Points across every region.
| System Facility | In-Game Function |
|---|---|
| Healer Kim | Visit Healer Kim at the Outpost to heal injured Aniimo |
| Outpost Hatchinator | Hatch discovered eggs using the outpost’s Hatchinator |
| Branch | Activate a Branch to reveal Blooms across a large area |
| Alpha Geoclaw | Alpha will unleash an Ice Prison to restrict movement |
| Aniilog Research | Complete research goals in the Aniilog to raise the Aniilog level |
Progression Milestones and Advanced Guides
Completing the training program makes you stronger and prepares your party to explore the world. Deepen your understanding of regional surges in our dedicated Aniimo Prismana Guide. Learn how to identify and pursue rare variant species with our detailed Aniimo Sparkling Guide. Plan evolutionary branches and trait progression using our comprehensive Aniimo Evolution Guide. Master high-level tactical boss mechanics by reading our guide on How to Beat Lita in Aniimo. Discover incubation timings and rare hatching odds with our walkthrough on How to Hatch Eggs in Aniimo. Continue refining your combat lineup on the team builder as you conquer challenging encounters across every territory.